Super Seed Bread

20 Sep

IMG_8983

I always assumed that there were approximately zero things I enjoyed about the end of summer—goodbye sunshine, warm weather, long sunlit days, eating dinner outside, picnicking, ice cream in the afternoon…need I go on?—but this morning, the first morning so far this school year that I have worn a scarf while taking my son to school, it occurred to me that there is, in fact one thing I enjoy about summer’s end. I get to start baking bread again.

IMG_8947

IMG_8952

IMG_8954

There are many people, of course, who take kindly to baking bread year round, and I wholeheartedly salute those people. But it remains a fact that I am simply not one of those people. During the summer, I prefer to not turn on my oven, and instead make a concerted effort to concoct all of our meals via the magic of a cutting board, a salad bowl, a grill, and/or a single burner on the stove. Eventually, come autumn, when the weather takes on its inevitable chill, and keeps that chill for the better part of eight months, the oven will come on, and stay on, producing breads and baked goods aplenty.

IMG_8953

IMG_8961

IMG_8964

IMG_8967

I baked this particular loaf of bread before summer officially began in Portland. The weather was still rather chilly, and I was craving the comfort of a freshly baked loaf of hearty bread to keep me company. 
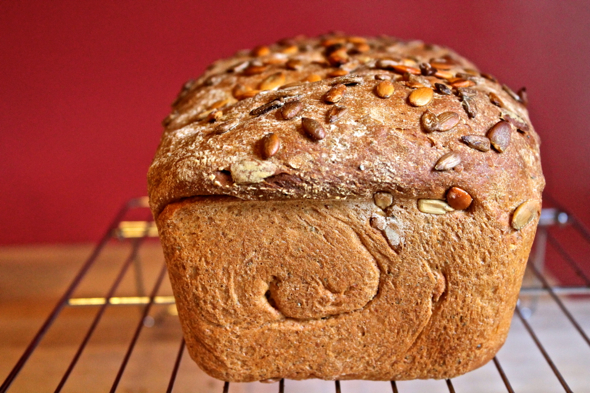
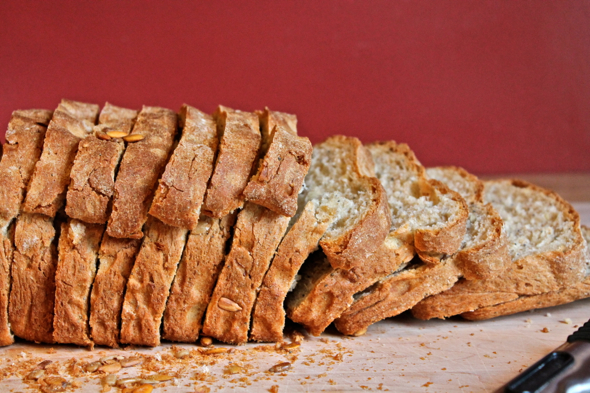
Packed with every type of seed I could find in the house, this is a bread for the ages. It is great for sandwiches, perfect as toast, and it will fast become your best friend if swiped with a touch of salted butter and drizzled with a wisp of honey. Best of all, however, is the fact that this bread seems to beckon people, particularly children, with its heavenly aroma and nutty bite, so, really, you won’t ever find yourself with simply the bread alone to keep you company.

IMG_8990

Last Year: Perfect Oven Fries with Truffle Salt and Lemon Pancakes with Blueberry Sauce

Super Seed Bread

Scant ½ cup warm water

2 ½ teaspoons active dry yeast

2 tablespoons honey-divided

¾ cup warm milk

1 tablespoon unsalted melted butter

2 cups unbleached all purpose flour, plus more for kneading

1 cup whole wheat flour

1 teaspoon sea salt

1/3 cup raw sunflower seeds

¼ cup raw pumpkin seeds

1 tablespoons poppy seeds

1 tablespoon sesame seeds

plus more pumpkin seeds and sunflower seeds for top

vegetable oil, for brushing over the top

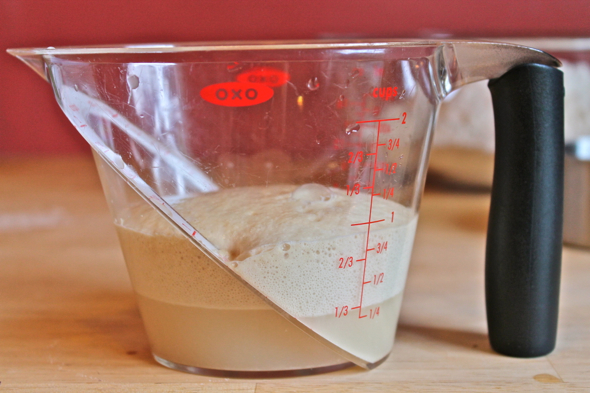
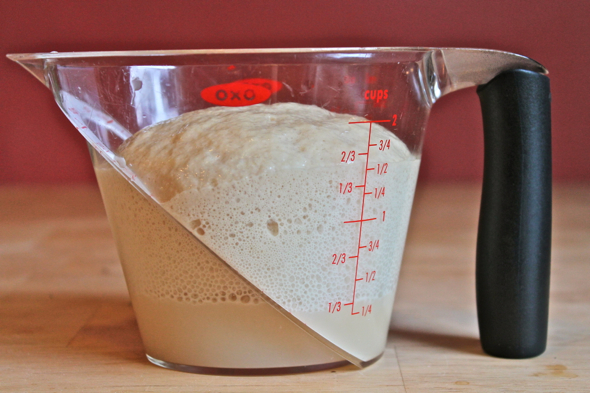
In a small bowl or measuring cup, combine the warm water with the yeast and one tablespoon of the honey. Stir to dissolve, then allow to stand at room temperature for 10 minutes, until nice and foamy.

In a large bowl, or in the bowl of a stand mixer fitted with the paddle attachment, combine the warm milk, the remaining tablespoon of honey, the butter, and the yeast mixture. Stir to combine, then add 1 cup of the all-purpose flour, all of the whole wheat flour, salt, and the sunflower, pumpkin, poppy, and sesame seeds. Beat on medium-high speed for 3 to 5 minutes (3 minutes with a stand mixer, 5 if mixing by hand), until a smooth dough forms. Lower speed to medium low, and continue to beat the mixture while adding the remaining 1 cup of flour, 1/3 of a cup at a time, until the dough becomes shaggy.

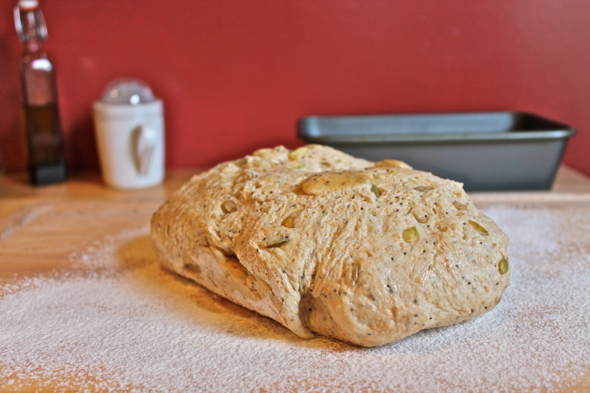
Turn the dough out onto a lightly floured surface or, if mixing the dough in a stand mixer, replace the paddle attachment with the dough hook. Knead the dough until it becomes smooth and silky, adding just a teaspoon or so of flour if the dough is too sticky to knead. If kneading by hand, you’ll work with the dough for 5 to 6 minutes. If kneading with a stand mixer set on a lower speed, your kneading should be complete in 3 or 4 minutes.

Form the dough into a ball, then place in a greased bowl to rise. Make sure that every part of the dough gets greased at least a little bit, lest it stick to the bowl as it rises. Cover the bowl with plastic wrap, a large lid, or a moist towel, and allow to rise at room temperature until doubled in size, about 1 hour to 1.5 hours.

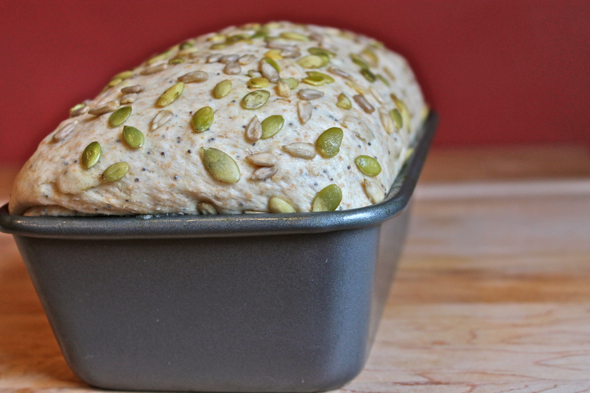
Carefully deflate the dough, then turn out onto a well floured surface. Grease a 9” by 5” loaf pan. Form the dough into a rectangle that is approximately 9” wide and 6” tall. Roll the dough into a tight loaf, pinching the seam closed at the end. Lightly brush or spray the loaf with just a bit of vegetable oil. Sprinkle about 1 tablespoon each of pumpkin seeds and sunflower seeds on your work surface, then roll the greased loaf in the seeds, covering as much of the loaf as possible.

Place the loaf in the greased 9” by 5” pan, cover lightly with plastic wrap and allow to rise until the dough has reached at least 1 inch above the rim of the pan, about 45 minutes to 1 hour.

While the dough is rising, preheat the oven to 375 degrees Fahrenheit. Bake the bread in the center of the oven for 40 to 45 minutes, until the crust is golden brown and the bread has an internal temperature of about 200 degrees Fahrenheit. Turn loaf out onto a wire rack to cool completely.

Makes 1 loaf.

Easiest Mango Ice Cream

13 Sep

IMG_9419

A few weeks ago, when I shared a recipe for fresh peach frozen yogurt, someone asked me a very valid question about whether there was a way to make frozen yogurt or ice cream without using an ice cream maker. Sadly, I did not know of a way, but the question got me thinking about whether or not it was possible to make creamy, homemade ice cream by just mixing things together, saying a small prayer to the ice cream gods, then plopping everything into the freezer. As it turns out, there is. Unbeknownst to me, people all around the world have been making simple freezer ice creams for decades, and, curiously, all of the recipes for those ice creams, whether they hail from the Southern United States or Southeast Asia, all contain one common ingredient: sweetened condensed milk. Now, I happen to be genetically linked to Southeast Asia, and my husband’s family hails from the South, but it had never occurred to me to use sweetened condensed milk in, well, anything. I wasn’t even sure what it was, to be honest.

IMG_9329

IMG_9332

Sweetened condensed milk, I have found, is sweetened milk, from which the water has been removed. It is not to be confused with evaporated milk, which is a different product all together, though, as you will soon see, one with which I have also recently become acquainted. Never in a million years would I have thought that I would be sitting here telling you about a recipe that contains two processed milk items that hail from sealed cans, but sometimes life takes a funny turn. And then you find yourself sitting around eating the best mango ice cream you’ve ever had, wondering what took you so long to discover such a fantastic recipe. With just mangoes, sweetened condensed milk, evaporated milk, and a bit of heavy cream to make things just that much more decadent, you, too, can create this wonderful ice cream in your very own kitchen, no ice cream maker required.

IMG_9421

Last Year: Tzatziki Biscuits with Caramelized Shallot Butter and Spice Cake with Salted Brown Butter Frosting

Mango Ice Cream

Heavily adapted from Mangoes and Curry Leaves, by Jeffrey Alford and Naomi Duguid

24 ounces of mango chunks (you can use frozen mango chunks, as I did, or you can get this amount of mango flesh from anywhere from 4-8 mangoes, depending on the size and ripeness of the mangoes you use—yes, it really can vary that much)

1 ¼ cups sweetened condensed milk

1 1/3 cups evaporated milk

½ cup heavy cream

juice of ½ a lime

pinch of salt

In the bowl of a food processor or large blender, puree mango chunks until smooth. Add sweetened condensed milk, evaporated milk, and heavy cream, and blend until combined. Add lime juice and salt, and blend once more.

Now, you have three different options at this point. You can either pour the mixture into a large freezer-safe container and freeze until firm, you can freeze the mixture in an ice cream maker, or you can pour the mixture into popsicle molds and freeze until completely firm (warning: this amount of ice cream mixture will make a huge number of popsicles—we’re talking more than a dozen).

The ice cream will be done freezing when it is firm, but it will remain a bit grainy when frozen solid. If you allow the ice cream to soften at room temperature for just a bit before scooping it, you will be rewarded handsomely with the creamiest ice cream you’ve ever produced in the comfort of your own home.

Makes around 6 cups of ice cream.

Zucchini and Egg Hash on Brioche Toast

6 Sep

IMG_9325

It is a commonly heard joke that, come the end of summer, you can’t safely answer the knocking at your door without running the risk of being met with an enormous bag of zucchini that someone is trying to trust upon you. If you see a neighbor crossing the street and attempting to flag you down while clutching a suspicious bulge of something or other in the hem of his or her shirt, your gut instinct is to run in the other direction. There is zucchini in that shirt! Run away, before you are made to accept it out of sheer politeness! Except if you are me, of course, in which case you will meet your neighbor halfway across the street, arms outstretched in anticipation of getting your hands on more garden fresh zucchini. Zucchini fritters, zucchini spears with Parmesan, grilled zucchini, zucchini in pakoras, and, of course, all varieties of zucchini bread—I wait all year to have enough zucchini at my disposal that I can cook with it nearly every day.

IMG_9313

IMG_9315

IMG_9317

We always grow zucchini in our garden, but this summer, what with all of the traveling we were going to be doing, we planted a very small, modest, and manageable garden. This garden consisted of a few tomatoes, a pot or two of herbs, and absolutely no zucchini. When we got back from traveling, I fully anticipated at least one person to begin unloading their garden zucchini spoils on us—in fact, I was very much looking forward to it—but it never happened. I briefly considered turning the tables on my neighbors, knocking on their doors and politely inquiring on the status of their zucchini population, but because I did not want my neighbors to begin thinking of me as, how to put this gently, completely nuts, I quickly abandoned the idea. Thus far, the only zucchini I’ve been gifted has come from my in-laws, two people who know how to grow a great garden.

IMG_9319

My in-laws are also avid cooks, so we often take the opportunity to discuss how we like to experiment with different foods and ingredients. My husband’s mother was telling me about a great way to cook zucchini as a sort of hash, shredded, sautéed, then lightly seasoned. I was immediately interested. I can’t remember who brought up the idea of putting an egg on top of the hash, but I do remember that I was the person responsible for immediately wanting to place the concoction on top of a piece of lightly toasted bread. It only took until the next day before I brought all of the ideas for this dish together: shredded, lightly crisped zucchini with a soft-cooked egg nestled within, placed on a piece of thick-cut brioche, and sprinkled with a generous serving of chopped garden tomatoes. Just in time for the end of summer, it’s the perfect way to celebrate your garden’s crop of delightful excess.

IMG_9321

Last Year: Fruit Crisp Made on the Grill, Grill-Roasted Lemon Rosemary Potatoes, and Pane Coi Sante, Bread of Saints

Zucchini and Egg Hash Over Brioche Toast

2 cups shredded zucchini (from 1 large or 2 small zucchini)

¼ cup thinly sliced onion

2 tablespoons extra virgin olive oil

salt and pepper to taste

2 or 3 eggs (2 if your eggs are large, 3 if your eggs are rather small)

2 slices of thick-cut brioche, lightly toasted

1 medium tomato, coarsely chopped

Place zucchini in a clean dishtowel, and squeeze tightly until a great deal of the zucchini’s juice is released. Alternately, you can just grab small handfuls of the zucchini in your hands and squeeze until the juice runs out, but some people may find this method a bit too barbaric (but not me—you have my full permission to proceed as you wish).

Heat olive oil in a medium pan set over medium-high heat. Add sliced onions, and sauté briefly, about 30 seconds, while stirring. When the onions have just started to lose some of their stiffness, add the zucchini, and stir to combine. Reduce the heat to medium, and sauté zucchini and onion, stirring occasionally, until dry and slightly browned, anywhere from 5 to 8 minutes. Sprinkle on some salt and pepper, and stir to incorporate. Form two (or three) small nests within the zucchini, then crack an egg into each nest. Cover the pan, reduce heat to low, and allow the eggs to cook until they reach your desired doneness.

Place a piece of brioche toast on a plate, top with half of the zucchini hash (making sure to include an egg, of course), sprinkle over a bit of chopped tomato, and add a touch more salt and pepper.

Serves 2.

%d bloggers like this: