Archive | Fruit RSS feed for this section

Strawberry Pecan Bread

31 May

IMG_8977

IMG_8955

IMG_8957

IMG_8958IMG_8959

IMG_8968

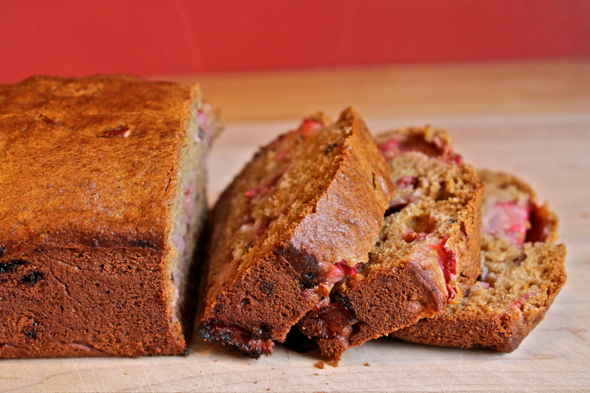
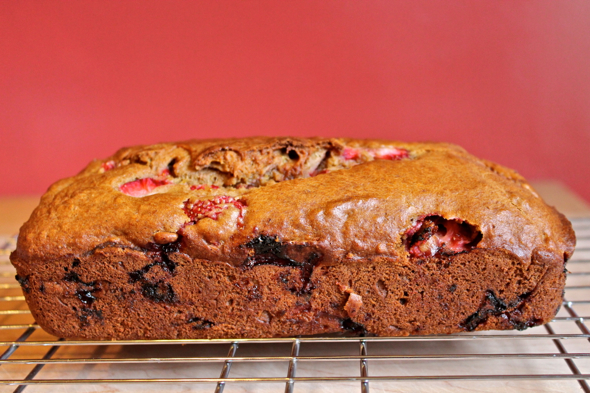
This bread falls somewhere in between a dessert and a snack, although, with only ¼ cup of added sugar to sweeten the whole loaf, I would argue that the scale tips more towards the latter. With hints of cinnamon and lemon zest, little bits of crunchy pecans, and mellow pockets of juicy strawberries, this welcoming bread would make a great picnic staple, but it’s also a welcome companion to a hot cup of coffee in the morning or afternoon. If you’re looking for a way to dress this fellow up, top a slice with a scoop of ice cream and call it dessert. Thus far, I’ve found no inappropriate way to enjoy this almost-summertime treat.

IMG_8979

Last Year: Ginger Cardamom Cake with Lemon Glaze, Stuffed Picnic Sandwich with Olive Tapenade, and Strawberry Lemon Cream Puffs

Strawberry Pecan Bread

2 large eggs, at room temperature

1/3 cup vegetable oil

¼ cup light brown sugar

½ cup unsweetened applesauce

1 cup unbleached all-purpose flour

½ cup whole wheat pastry flour

1 teaspoon cinnamon

½ teaspoon baking soda

½ teaspoon salt

1 tablespoon freshly grated lemon zest

1 ½ cups sliced fresh strawberries

½ cup coarsely chopped pecans

Preheat oven to 350 degrees Fahrenheit. Lightly grease and flour the inside of a 9”x5” loaf pan.

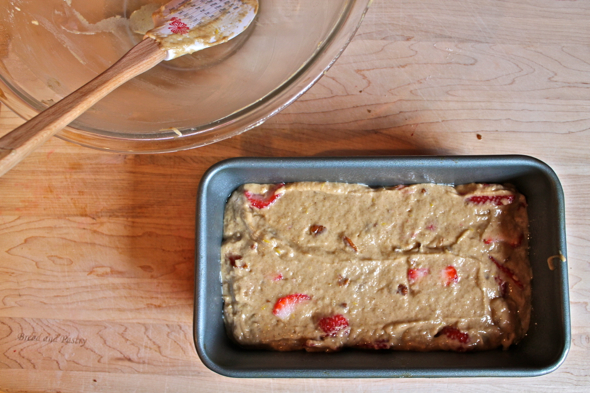
In a small bowl whisk together the eggs, oil, brown sugar, and applesauce. In a large bowl, whisk together the flours, cinnamon, baking soda, salt, and lemon zest. Pour the liquid ingredients over the dry ingredients, and stir lightly until just combined. Add the strawberries and pecans, and gently stir and fold to combine.

Pour the batter into the prepared loaf pan. Smooth the top of the batter, then bake in the center of the oven for 75 to 90 minutes, until a toothpick or cake tester inserted in the middle of the loaf emerges mostly clean, with just a crumb or two attached.

Allow bread to cool in pan for 10 minutes, then invert onto a wire rack. Turn loaf right side up, then allow to cool almost completely before slicing and eating.

Raspberry Cheese Blintzes

29 Mar

IMG_8714

IMG_8695

IMG_8698

IMG_8699

IMG_8704

It is not often that I look at a food and the most distinctive adjective I can come up with to describe its appearance is “cheery,” but that is exactly what happened when I took a look at a plate of these delicious crepes wrapped around a soft pink filling of raspberries, ricotta, and cream cheese. These blintzes, with their brunch-eaten-outside vibe and touches of fresh fruit, made me think of spring, and when enveloped in the sort of grayness that we in the PNW experience throughout the plodding months of the winter and beyond, a tasty little hint of spring is an especially cheery sight to behold.

IMG_8710

Last Year: Esquire Pancakes–apparently the end of March makes me think of pancakes and the like.

Raspberry Cheese Blintzes

Cheese Filling

¼ cup cream cheese, at room temperature

¾ cup ricotta cheese

finely grated zest of 1 lemon

2 tablespoons sugar

1 teaspoon pure vanilla extract

pinch of salt

½ cup fresh raspberries

Crepe Batter

1 cup milk

2 large eggs

1 cup sifted unbleached all-purpose flour

¼ teaspoon salt

For Cooking:

4 to 6 tablespoons unsalted butter

To make the cheese filling, combine cheeses, lemon zest, sugar, vanilla, and salt. Whisk thoroughly to combine, until the filling is light and fluffy. Using your hands, break apart the raspberries over the filling, then fold the berries into the mixture.

To make the crepe batter, in a blender, combine milk and eggs, then blend until just combined. Add flour and salt, then blend until smooth, stopping the blender and scraping down the sides if necessary.

Heat an 8-inch or 10-inch skillet over medium-high heat. Add a teaspoon or so of butter to the pan, or just enough butter to coat the bottom of the pan. When the butter has melted pour about 2 tablespoons of batter into the pan, then tilt the pan to coat the bottom as much as possible. Cook the crepe on one side only, until the edges appear dry, about 1 minute. Slide the crepe onto a plate, or remove it to a plate using a flexible spatula. Repeat until all the batter has been used, stacking the finished crepes on top of one another, and adding butter to the pan as needed. Depending on how judiciously you doled out the batter, you’ll end up with anywhere from 9 to 12 crepes.

To make the blintzes, place a heaping tablespoon of the cheese and raspberry mixture onto the center of a crepe. Fold in the sides, then the ends, to encase the cheese and form the crepe into a square.

Heat 1 tablespoon of butter in a medium to large skillet over medium-high heat. As you wrap each blintz, place it in the pan, seam side down, and cook, turning over once, until the blintzes are golden brown on both sides. The blintzes should only take a maximum of about 3 minutes total to finish cooking.

You can serve these blintzes hot, warm, or cold. If you want to make them ahead of time, you can place the fully-cooked then cooled blintzes in the refrigerator overnight (wrapped in airtight plastic), then either reheat them in a pan the next morning using the same skillet-browning method as before, or serve them cold, which I sort of prefer. Serve with extra raspberries, and, if you wish, a small dollop of whipped cream, sour cream, or crème fraiche.

Homemade Energy Bars

24 Jan

IMG_8328

IMG_8309

IMG_8312

IMG_8315

IMG_8317

IMG_8319

I, the person who has never actually seen an energy bar, have made you some energy bars. Actually, what I have made is not so much an energy bar, as it is what I think an energy bar should be. It is packed with protein, filled with fruit, and it contains no gluten or grains (not because I don’t eat gluten or grains, but because I thought people might like having the option of an energy bar without those things in it). It is just about as friendly and harmless a snack as anyone could ever wish for, only these suckers are also super delicious. Like, almost dangerously so. I’ve taken to eating one just about every other waking hour, which means that I am going to have to start preparing for some hiking or power-biking pretty soon, lest I waste the virtues of these energy bars on my current low energy activities of sitting, typing, and reading.

IMG_8332

Last Year: Yard Long Beans with Chile Oil and Garlic Bits and Ponzu-Marinated Flank Steak

Homemade Energy Bars

These little bars are basically little more than a collection of fruits and nuts all ground together and then baked a bit to keep their shape. The recipe below was based on whatever seeds, nuts and dried fruits I had sitting around in the house, but I’d encourage you to use whatever combination of flavors you think would be good. I think dried, unsweetened coconut would be great in here, as would dried apricots, dried apples, or dried, unsweetened cherries.

¼ cup unfiltered apple cider

½ cup whole Medjool dates, cut into quarters, seeds removed

½ cup dried mangoes

½ cup dried pears

1 cup whole raw almonds

¼ cup raw pepitas (pumpkin seeds)

¼ cup raw sunflower seeds

¼ teaspoon sea salt

Preheat oven to 300 degrees Fahrenheit. Line a baking sheet with parchment paper, then set aside.

In a medium bowl, combine apple cider, dates, dried mangoes, and dried pears. Toss to combine, then allow to sit and soak for a bit while you gather the remaining ingredients.

In the bowl of a food processor, combine soaked dried fruits (along with any apple cider remaining in the bowl) and almonds. Pulse 5 or 6 times to coarsely chop everything. Add the pepitas, sunflower seeds, and salt, then pulse half a dozen more times until the mixture sticks together and begins to clump up. There should still be big chunks of seeds and nuts visible.

Turn mixture out on to a large sheet of wax paper. Wet your hands with water (to prevent the mixture from sticking to your hands too much), then shape the mixture into a 12” by 6” rectangle. Cut the rectangle into 8 bars that are roughly 6” by 1.5” a piece. Using a flexible spatula, transfer bars to parchment-lined baking sheet. Bake in center of oven for 10 minutes, then carefully turn each bar over and continue to bake for an additional 8 to 10 minutes. The bars should be slightly golden, but the nuts should not be singed or burned.

Remove from oven, and allow bars to cool on baking sheet. Store in an airtight container for 3 days at room temperature, or in the refrigerator for up to a week. Or just eat for breakfast, lunch, and dinner, and never find it necessary to store them anywhere for any prolonged period of time.