Tag Archives: dessert

How to Make a Heart-Shaped Cake

11 Feb

IMG_8564

Regardless of one’s personal feelings about Valentine’s Day, it’s tough to completely shun the sentiment attached to the holiday. We’re pretty darn mushy in this house when it comes to declarations of love and affection (especially with our son, since we know that there are only a couple of years remaining wherein we can still tell kiss the kid and tell him we love him without having him draw back in horror and tell us that we’re lame), so while Vanlantine’s Day itself may not provide that much of a difference in terms of making sure we make our fondness for one another clear, it does give me an excuse to get a little fancy with my food preparation.

In years past, I have made heart-shaped cookies on Valentine’s Day, but this year, in keeping with my cake-themed personal goal, I thought it would be nice to highlight a simple Valentine’s Day treat that is suitable for nearly anyone’s baking skill set. In a slight change of events, this particular tutorial is not so much focused on the recipe for a cake as it is on the presentation of a cake. And, as I mentioned before, it’s a dead simple project that anyone can tackle, no special tools needed. If you have a square baking pan, a knife, and a cereal bowl, you can make a heart-shaped cake. No special heart-shaped pan required.

STEP 1: To begin, bake a cake in a square pan. (I baked this coconut chocolate marble cake in a 9”x9” square pan instead of a bundt pan, and it turned out wonderfully.) When the cake is cooled, place it diagonally on a clean, flat surface.

IMG_8545

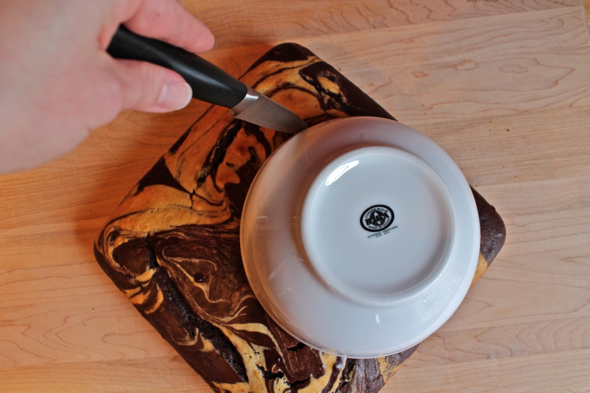
STEP 2: Place a cereal bowl over the left hand corner of the cake, and, using a sharp knife, very lightly trace around the top half of the bowl.

IMG_8546

IMG_8549

STEP 3: Move the cereal bowl to the right hand corner of the cake, and trace around the bowl in the same manner as before.

IMG_8550

STEP 4: Cut all the way through the cake on the outermost left and right corners of the area traced around the cereal bowl. You will now have two rounded corners.

IMG_8552

STEP 5: Place the cereal bowl back on the left hand side, and cut the cake around the top curve of the bowl, stopping about halfway across the cake, where the curve of the bowl points to the center of the cake.

STEP 6: Move the cereal bowl to the right hand side, and continue cutting in the same manner as before.

IMG_8553

You have now cut your cake in the shape of a heart.

IMG_8556

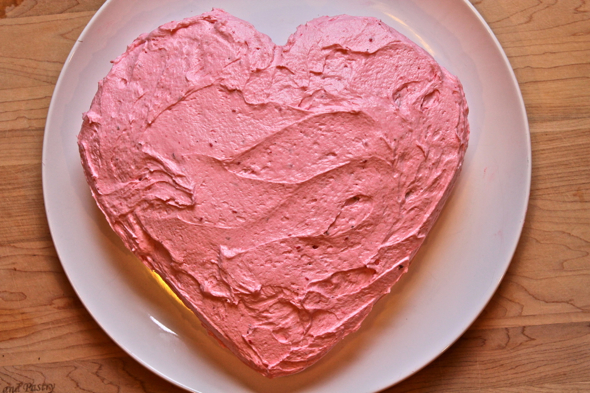
Use the knife to touch up the shape here and there, cutting in the top center of the heart a bit more if you want more definition. I made a single layer cake for this project, but you can certainly make a two or even three-layer cake if you choose. Topped with a creamy blanket of pink raspberry buttercream, it’s a sweet and cheerful treat that you can tackle in no time at all, no special tools needed.

IMG_8564

IMG_8565

Last Year: Indian Cauliflower Rice–the cauliflower IS the rice in this delicious, light meal

Fruit Crisp Made on the Grill

27 Aug

The wait for hot summer weather in Portland can sometimes be interminable, but then, when the hot weather does finally hit, people seem to forget all the grousing and moaning that they previously took part in when it wasn’t hot enough for their liking, taking part instead in a great deal of grousing and moaning about how unbearably hot it is. When it comes to grousing and moaning, I take part, as most people do, in my fair share (though I generally reserve my woeful moaning for talk of baseball), but you will never, ever find me complaining that it is too hot in Portland. It rains nine months of the year here, and I can’t remember the last time I wasn’t forced to wear a sweater throughout the month of June. More than ¾ of my life is spent waiting for hot weather to arrive.

In addition to having an excuse to lay around in a hammock and read, hot weather also gives me a great excuse to try out the many, many things I’d like to attempt to cook on a grill. The standards of meat and vegetables are always a pleasure, but, as is my way, I have always wanted to try out a number of desserts on the grill. In the past, I have grilled fruit, sprinkled with a bit of brown sugar and drizzled with dots of vanilla, but I’ve always known that I wanted to do more with a grilled dessert.

This crisp is the perfect gateway for those of you who would like to audition a grilled dessert. I say this, because I am a person who wants to tackle more dessert-making on the grill, and the success of this crisp has made me only more eager to do so. The fruit, bubbling away contentedly, took on a deep and luscious flavor when contained in the grill for the better part of an hour, and the buttery oat topping seemed to almost melt into the fruit in parts, resulting in a crisp that was not so much actually crisp, but something even better. When slowly grilled, the fruit and the topping joined forces, settling into one another like a perfectly formed puzzle. It was a delightful discovery, and a wonderful introduction to what I hope will be a new world of desserts.

Last Year: Mimi’s Ginger Lemon Tea–good as a cool summer drink, a warm winter tonic, and a catch-all healer for anything and everything that ails you.

Grilled Fruit Crisp Recipe

Prepare an outdoor grill for indirect cooking (more on how to do that here). With the lid down, heat one side on high until the internal temperature of the grill reaches about 350 degrees Fahrenheit.

Topping:

½ cup unbleached all-purpose flour

1/3 cup rolled oats (not quick cooking)

¼ cup light brown sugar

¼ cup coarsely chopped pecans or almonds, or a mix of the two

pinch of cinnamon

pinch of salt

6 tablespoons cold butter, cut into pieces

Fruit:

6 cups fruit, sliced into roughly ½-inch pieces (I used strawberries, peaches, and blueberries which, obviously, I did not have to slice)

zest and juice of 1 lemon

1 tablespoon cornstarch

3 tablespoons light brown sugar

pinch of cinnamon

To make the topping, in a medium bowl combine the flour, oats, brown sugar, nuts, cinnamon, and salt. Stir together, then add the butter pieces and, using a pastry cutter or two knives, cut the butter into the flour mixture until the topping resembles coarse crumbs with a few smallish pea-sized bits of butter throughout. Refrigerate the topping while you prep the fruit.

In a medium bowl, combine all ingredients for the fruit filling and toss to combine. Transfer fruit to a heavy cast iron skillet (mine was a 12-inch skillet, but a 10-inch one would also work), spreading it out evenly. Spoon the topping mixture over the fruit as evenly as possible.

Cook the crisp on the unheated side of the grill, lid down, for 40 minutes, until the fruit is bubbling and the edges of the crisp topping have just started to turn golden. Be very careful when remove the skillet from the grill, as it will be incredibly hot. Allow the crisp to cool at least 15 minutes before serving.

Serve plain or with ice cream.

Lemon Bergamot Bars

7 Mar

I will never claim to be a fan of big surprises or intense fanfare.  Preferring to live a life that is relatively free of drama or explosive displays of showiness (all I have to do is hear of people getting engaged via a line of skywriting or announcing their pregnancy by hiding a positive pregnancy test in someone’s birthday present and I start to feel all sweaty and embarrassed) might explain why I am so fond of foods that contain a bit of the unexpected.  A rich brownie with a subtle undercurrent of cardamom and chipotle.  A complicated Thai curry with a kick of lime that comes in at the end and smoothes out its blend of coconut and spice.  And now, what currently stands as my favorite example of a sneaky flavor, a hint of bergamot concealed within a batch of brightly tart lemon bars.

Hailing from Tartine, the inaugural cookbook from the incredible San Francisco bakery of the same name, this is a lemon bar that pulls no punches when it comes to flavors.  The meltingly delicious shortbread base is baked to a deep golden brown, giving it the taste of mellow, nutty brown butter.

The thick lemon custard that rests on top is fresh and tart, and does not make the mistake of masking its lemony sourness under a cloying sweetness.  The bergamot (an addition made optional in the cookbook, but now considered by me to be an utter necessity) cuts through the clean taste of the lemon, dotting each bite with the pleasant sensation of subtly bitter orange.  (Bergamot oranges, a hybrid citrus fruit that contain elements of both Mediterranean lemons and Seville oranges, provide the distinctive citrus undertone found in Earl Grey tea, and it creates a similarly aromatic and companionable effect here.)

I may not be one for surprises, but I can’t say I have ever shied away from the pleasures of variety.  Eating one square of this lovely pastry is like taking a taste tour of a pastry case (brown butter shortbread cookies!  Lemon custard!  Candied orange!), providing your taste buds with thrills aplenty, minus even the slightest possibility of social discomfort.

Lemon Bergamot Bars

From Tartine

Crust

1/2 cup confectioners’ sugar

1 1/2 cups all-purpose flour

3/4 cup unsalted butter, at room temperature

Filling

1/2 cup all-purpose flour

2 1/4 cups sugar

1 cup plus 2 tablespoons lemon juice

zest from 1 small bergamot orange, grated or finely chopped

6 large whole eggs

1 large egg yolk

pinch of salt

confectioners’ sugar (optional)

Preheat oven to 350 degrees F.  Butter a 9×13 inch baking pan.

To make the crust, sift the confectioners’ sugar into the bowl of a standing mixer fitted with the paddle attachment.  Add the flour and stir to mix.  Add the butter and beat on low speed just until a smooth dough forms.  Transfer dough to the prepared pan and press evenly into the bottom and 1/2 inch up the sides of the pan.  It should be about 1/4 inch thick.  To help even out the crust, use the flat bottom of any type of cup, pressing down firmly.  Line the crust with parchment paper and fill with pie weights (dry beans or about a cup’s worth of pennies will provide the same effect as pie weights).  Bake the crust until it colors evenly to a deep golden brown, 25-35 minutes.  Rotate the pan 180 degrees is the crust appears to be baking unevenly.

While the crust is baking, make the filling: Sift the flour into a mixing bowl.  Add the sugar and whisk until blended.  Add the lemon juice and bergamot orange zest and stir to dissolve the sugar.  In a separate mixing bowl, whisk the whole eggs and egg yolk with the salt.  Add the eggs to the lemon juice mixture and whisk until well mixed.

When the crust is ready, pull out the oven rack holding the crust, remove the parchment paper and pie weights, and pour the filling directly into the hot pan.  (It is easiest to pour the custard into the pan if the pan is in the oven.)  If the crust has come out of the oven and cooled before you have finished making the filling, put it back in for a few minutes so that it is hot when the custard is poured into it.  Reduce the oven temperature to 300 degrees F and bake just until the center of the custard is no longer wobbly, 30-40 minutes.

Let cool completely on a wire rack, then cover and chill well before cutting.  If you like, dust the tops of the squares with confectioners’ sugar.  They will keep well in an airtight container or well covered in the baking dish in the refrigerator for up to 4 days.


%d bloggers like this: