Tag Archives: food

Roasted Parsnip and Potato Hash

6 Feb

IMG_8239

IMG_8224

IMG_8225

IMG_8228

IMG_8257

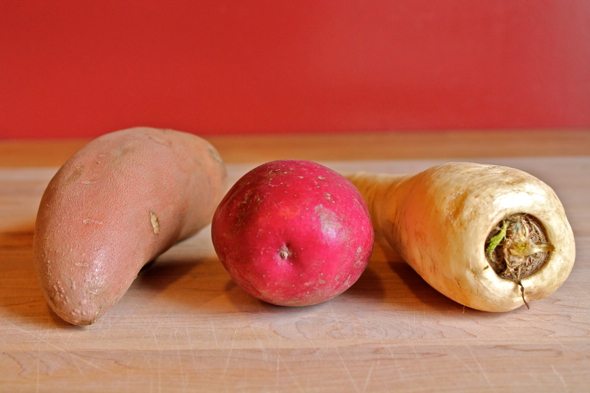
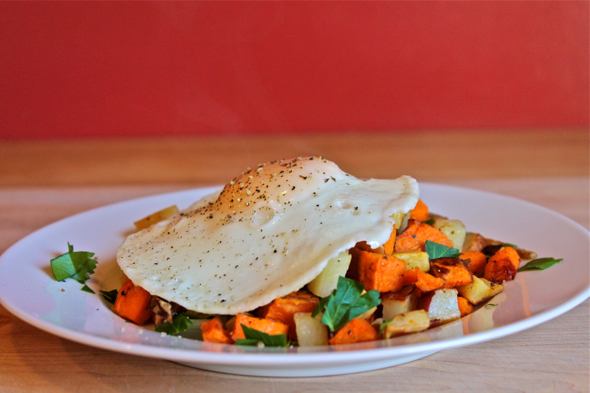
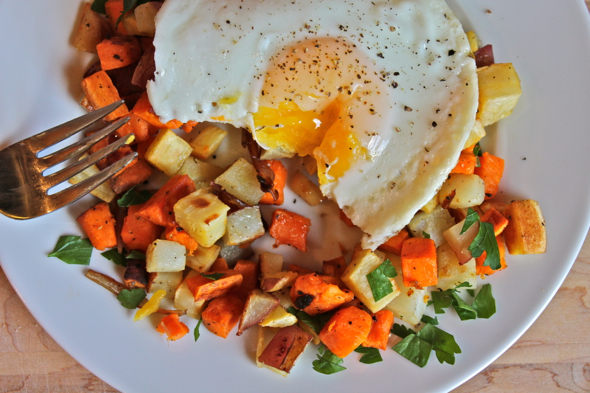
I just made this great vegetable hash out of three different types of root vegetables, and the whole time I was making it I was wondering how many other root vegetables I could throw into the mix and still achieve the same comforting, savory bite. The answer is, of course, that I could throw in all the root vegetables and always end up with a fantastic combination. Here I have parsnips, sweet potatoes, and red potatoes, but I could easily throw in a diced carrot, a turnip, or even a golden beet and effortlessly end up with a lovely, delicious platter of food.

IMG_8231

IMG_8242

Last Year: Gingerbread Waffles and Caramel Cream Sandwich Cookies

Roasted Parsnip and Potato Hash Recipe

1 large parsnip, peeled if the skin is tough

1 medium orange-fleshed sweet potato, peeled if the skin is tough

1 large red potato

3 large cloves of garlic

1 large shallot

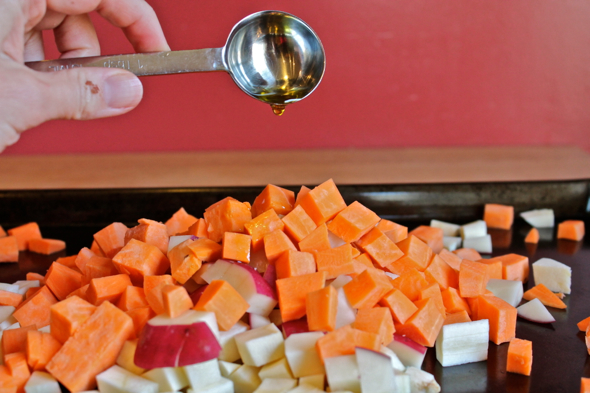
2 tablespoons olive oil

salt and pepper to taste

handful of chopped Italian parsley

Preheat oven to 400 degrees Fahrenheit. Arrange a rack in the second-lowest position.

Dice the parsnip and potatoes into very small ¼-inch chunks. Very coarsely chop the garlic into rough quarters. Slice the shallot in half lengthwise, then into medium ribs. Combine parsnip, potatoes, garlic, and shallot on a large, heavy baking sheet. Drizzle with olive oil, sprinkle with salt and pepper, then toss everything together to combine.

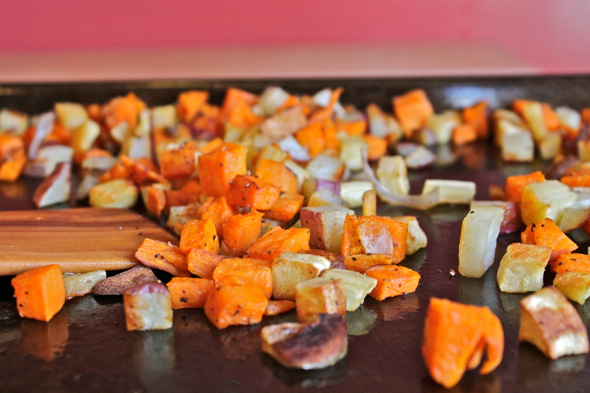
Roast on second-lowest oven rack for 20 minutes, until the bottoms of the root vegetables are nicely browned. Toss the vegetables around a bit, turning them over as much as possible, then continue to roast them for another 5 minutes, until the edges are crisp and golden.

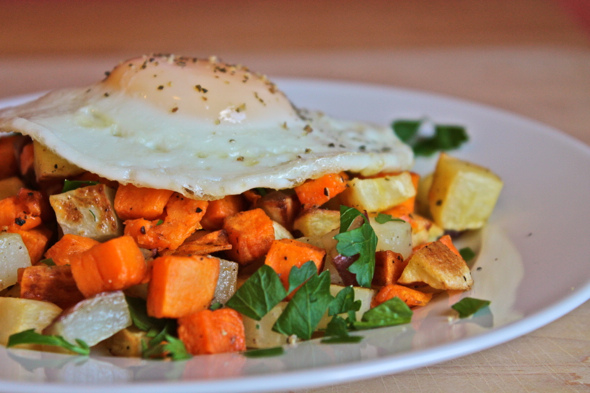
Sprinkle with chopped fresh Italian parsley, then serve with softly fried or poached eggs.

Serves 2 to 4 people, depending on how generous you make the servings.

Lemon Coconut Cake

30 Jan

IMG_8276

IMG_8230

Because, as we know, I like making cakes, I tend to have a lot of documentation of many, many cakes. After a while, however, though the cakes I make are mostly new affairs that I test out in the name of promised deliciousness, I have noticed that many of the cakes I make tend to look fairly indistinguishable from one another. Observe:

This ginger cardamom cake:

cardc

looks a lot like this rum cake:

rumc1

which looks pretty much identical to our current lemon coconut cake:

IMG_8269

The cakes may look the same, but their tastes are anything but the same.

IMG_8259

IMG_8261

With coconut milk taking the place of regular milk, an added hit of shredded coconut, and a double burst of both lemon zest and fresh lemon juice, this cake is a burst of brightness. The coconut shines through like a tropical dream, and the punch of lemon, plumped up just a tad by the addition of a light lemon glaze, makes for a perfect pairing. Though not a traditional pound cake in the sense that the ratios of flour, butter, eggs and sugar do not line up equally, the crumb of this cake is very much in the realm of a pound cake, with a dense, moist crumb, and the unmistakable flavor undertone of rich butter. It may look like a plain, innocent bundt cake, but don’t be fooled.

IMG_8281

IMG_8279

Last Year: Apple Cinnamon Crumb Bread (this may be called a bread, but, come on, it’s a cake in a bread tin) and Grilled Lemongrass Chicken

Lemon Coconut Cake

2 2/3 cups unbleached all-purpose flour

2 ¼ teaspoons baking powder

½ teaspoon salt

1 cup (2 sticks) unsalted butter, softened at room temperature

1 1/3 cups granulated sugar

4 large eggs, at room temperature

1 teaspoon pure vanilla extract

2 teaspoons freshly grated lemon zest

½ cup unsweetened shredded coconut

¼ cup freshly squeezed lemon juice

1 cup coconut milk

Lemon Glaze:

1/3 cup powdered sugar

2 tablespoons freshly squeezed lemon juice

drop of pure vanilla extract

pinch of sea salt

Preheat oven to 350 degrees Fahrenheit. Generously grease and flour a 10 or 12-cup bundt pan.

Into a medium bowl, sift together flour, baking powder, and salt. Set aside.

In a large bowl, or in the bowl of a stand mixer, cream butter on medium-high speed until soft and fluffy. Grandually add in sugar and continue to beat on medium high speed until mixture is fluffy and light. Reduce mixer speed to medium, and add in eggs one at a time, scraping down the sides and bottom of bowl in between each egg. Beat in vanilla. Beat in lemon zest, shredded coconut, and lemon juice, and mix until just combined.

Scrape down the sides and bottom of bowl, then add in 1/3 of the flour mixture, followed by ½ of the coconut milk. Mix until barely combined, then add in ½ of remaining flour mixture, barely mixing to combine, then rest of coconut milk. Add in remaining flour, beating until just combined. Scrape down the sides and bottom of bowl one last time, and gently fold the batter two or three times, just to incorporate any unmixed bits of flour.

Pour batter into prepared bundt pan, then bake in center of oven for 50 to 55 minutes, until a cake tester inserted into the cake emerges with just a few moist crumbs attached. Cool cake in pan for 10 minutes, then invert onto a wire rack to continue cooling.

While cake is cooling, prepare glaze. In a small bowl, combine all glaze ingredients and whisk to combine thoroughly. Whisk for 2 to 3 minutes, until powdered sugar has lost some of its graininess.

While the cake is still warm, gently brush on glaze, covering as much of the surface of the cake as possible.

Homemade Energy Bars

24 Jan

IMG_8328

IMG_8309

IMG_8312

IMG_8315

IMG_8317

IMG_8319

I, the person who has never actually seen an energy bar, have made you some energy bars. Actually, what I have made is not so much an energy bar, as it is what I think an energy bar should be. It is packed with protein, filled with fruit, and it contains no gluten or grains (not because I don’t eat gluten or grains, but because I thought people might like having the option of an energy bar without those things in it). It is just about as friendly and harmless a snack as anyone could ever wish for, only these suckers are also super delicious. Like, almost dangerously so. I’ve taken to eating one just about every other waking hour, which means that I am going to have to start preparing for some hiking or power-biking pretty soon, lest I waste the virtues of these energy bars on my current low energy activities of sitting, typing, and reading.

IMG_8332

Last Year: Yard Long Beans with Chile Oil and Garlic Bits and Ponzu-Marinated Flank Steak

Homemade Energy Bars

These little bars are basically little more than a collection of fruits and nuts all ground together and then baked a bit to keep their shape. The recipe below was based on whatever seeds, nuts and dried fruits I had sitting around in the house, but I’d encourage you to use whatever combination of flavors you think would be good. I think dried, unsweetened coconut would be great in here, as would dried apricots, dried apples, or dried, unsweetened cherries.

¼ cup unfiltered apple cider

½ cup whole Medjool dates, cut into quarters, seeds removed

½ cup dried mangoes

½ cup dried pears

1 cup whole raw almonds

¼ cup raw pepitas (pumpkin seeds)

¼ cup raw sunflower seeds

¼ teaspoon sea salt

Preheat oven to 300 degrees Fahrenheit. Line a baking sheet with parchment paper, then set aside.

In a medium bowl, combine apple cider, dates, dried mangoes, and dried pears. Toss to combine, then allow to sit and soak for a bit while you gather the remaining ingredients.

In the bowl of a food processor, combine soaked dried fruits (along with any apple cider remaining in the bowl) and almonds. Pulse 5 or 6 times to coarsely chop everything. Add the pepitas, sunflower seeds, and salt, then pulse half a dozen more times until the mixture sticks together and begins to clump up. There should still be big chunks of seeds and nuts visible.

Turn mixture out on to a large sheet of wax paper. Wet your hands with water (to prevent the mixture from sticking to your hands too much), then shape the mixture into a 12” by 6” rectangle. Cut the rectangle into 8 bars that are roughly 6” by 1.5” a piece. Using a flexible spatula, transfer bars to parchment-lined baking sheet. Bake in center of oven for 10 minutes, then carefully turn each bar over and continue to bake for an additional 8 to 10 minutes. The bars should be slightly golden, but the nuts should not be singed or burned.

Remove from oven, and allow bars to cool on baking sheet. Store in an airtight container for 3 days at room temperature, or in the refrigerator for up to a week. Or just eat for breakfast, lunch, and dinner, and never find it necessary to store them anywhere for any prolonged period of time.